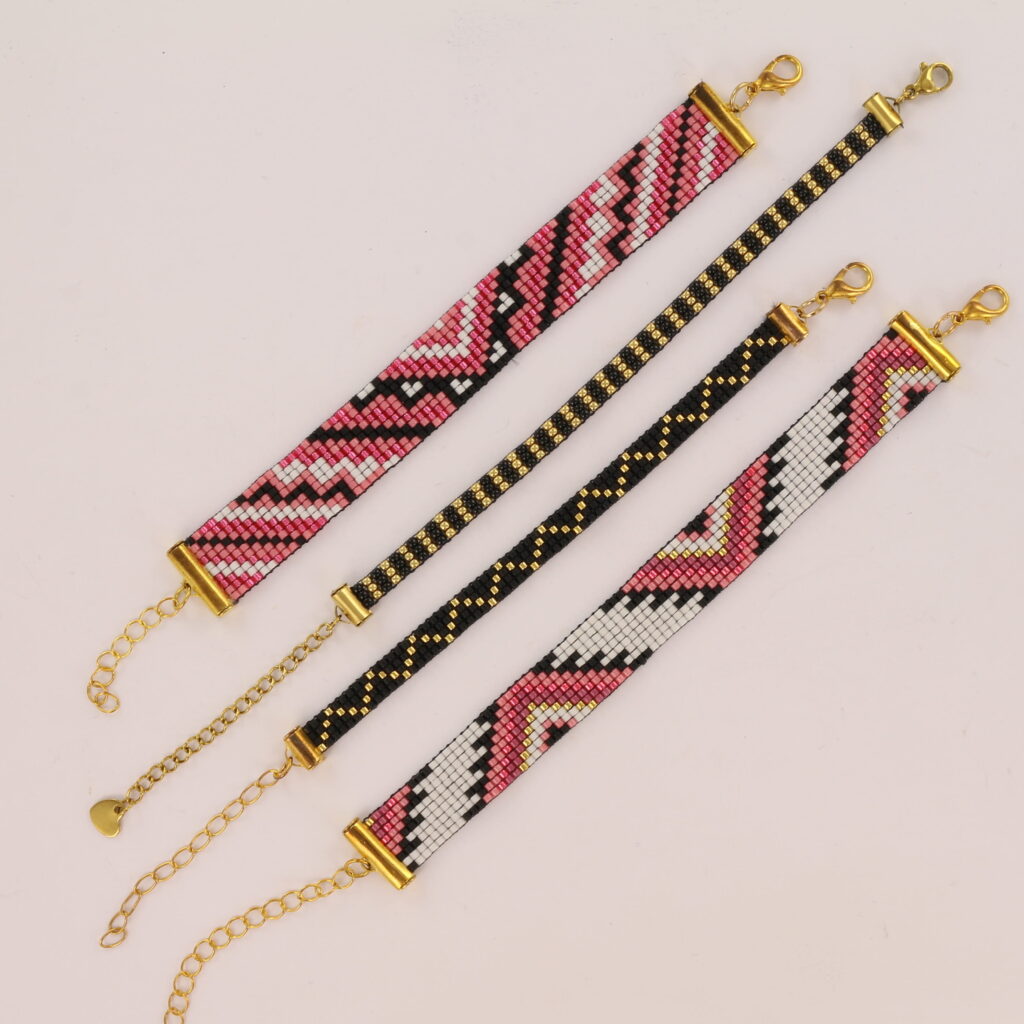
A popular technique is making bracelets by bead weaving on a loom. The most used beads are delica beads, because with the cylinder shape they give a beautiful smooth surface. This allows you to create beautiful patterns for it.
When adding the threads, make sure that the threads have good tension, so that you can thread easily and that the beads lie well against each other. Avoid a too high tension, because then there is a chance that your bracelet will curl up as soon as you take it off the loom. This is a bit of a test in the beginning, but you will get more feeling for it when you repeat it.
INSTRUCTIONS
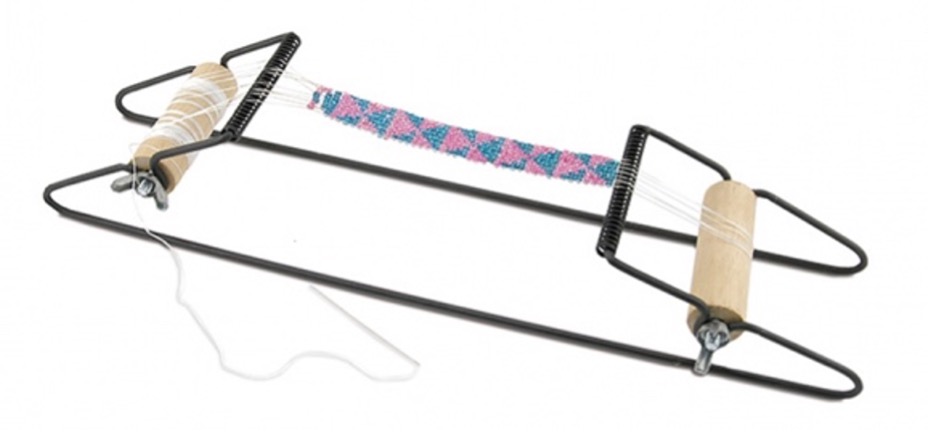
START) Undo some thread from the spool but do not cut this yet. Attach the end of this thread to the metal pin on your beadingloom. Then pass the thread back and forward around the metal pins on both sides of the loom. The space between the thread should be approximately the length of one beads, which you are going to add in between them.
The number of threads must be one more than the number of beads of your bracelet.

STEP 1) After you have attached the base threads, take a new piece of thread (which we are ging to use to weave) and tie this onto the most left base thread. Leave a tail of 20 cm that allows you to hide the thread back into your work as soon as you are finished. After this step, pick-up 6 beads onto the thread.

STEP 2) Bring your thread to the right, going below the base threads and place your finger under the beads. Use your finger to push the beads up and place them inbetween the base threads. Don’t pull too hard here, just place them slowly between the base threads. This can be a bit difficult in the first row, but will become easier in the next rows.

STEP 3) When the beads are in their right place go back to the left and go through all 6 beads. Make sure your needle(and thread) goes above the base threads! This way the beads will stay in their current place and your first row is already there. Pull lightly.
STEP 4) String 6 new beads onto your thread and place them below your previous row, this time again with one bead in each gap between the threads. Repeat the previous step.

END) Continue this way until you reach the desired length of the bracelet. Keep in mind that you also need some space for a locket. If you use an extension chain, you can leave around 2 to 3 cm free for this.
TIPS, TRICKS AND INSPIRATION:
- For the clasp, you can choose a slide end tube with a jump ring, cap, and extension chain. Slide the slide end tube over the first and last row of beads to secure them. The slide end tubes from Miyuki will fit perfectly over a delica 11/0 bead.
- You can use a different thread for the outer threads than the threads between them. This will give your bracelet a nice edge, creating a playful effect. You can think about making a slide knot of that thread to finish your bracelet. You can make your pattern smaller on the end to work to a point where the outer threads will meat. You can simply do this to increase the beads you add step by step. If you use a thicker tread for all the bases threads, they will be visible between the rows of beads. This a choise of preference.
- Use Miyuki beading thread for the weaving in a color that fits the colors beads (and outer threads) you will use. You wil see the thread on the sides of your work. The Miyuki beading thread is thin and will fit a few time through the beads.
- You can also weave with seed beads. Keep in mind that the shape of seed beads differs from that of Delica beads. This may cause a pattern to turn out differently, as seed beads are rounder/wider. You can combine different beads. For example, consider Delica 11/0 with seed beads 15/0
- With a checkered pattern from a notebook or a pattern sheet that you can find online, you can also draw your own patterns by coloring the boxes.