
Because we got a lot of questions on how to make these necklaces, we made this tutorial. With clear pictures and a step-by-step explanation we’ll show you how to make the necklace with trägerperlen beads. When you want to make something else with the peyote-stich, this explanation can also come in handy.
The part that most people struggle with, the beginning of the peyote stitch, will be explained as well.
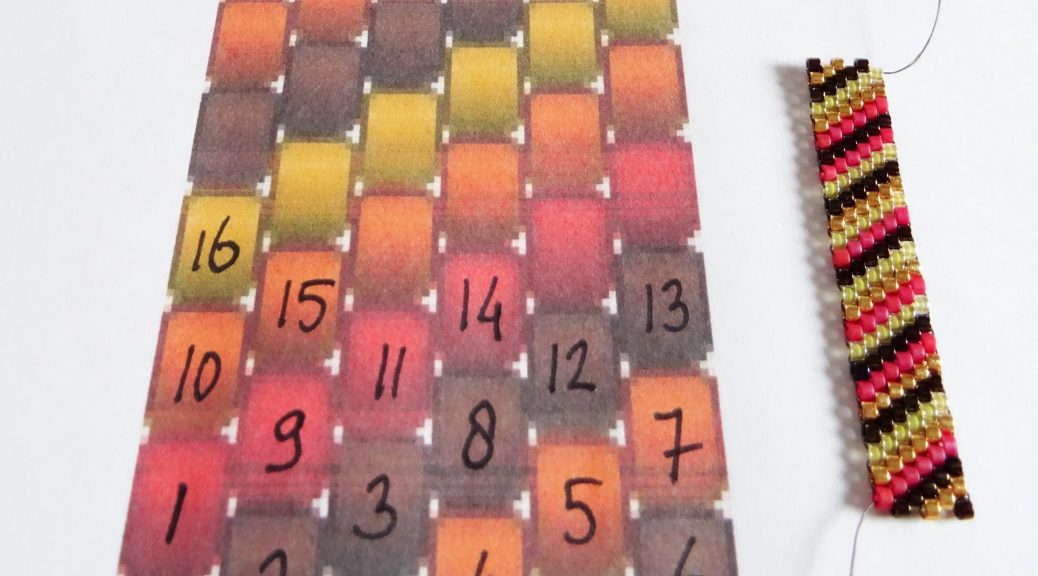
The tutorial is based on one of the patterns we send to our customers when they buy the trägerperlen beads. The following colors are used:

The beginning of a peyote is hard because people usually don’t know with which beads they have to start. Below you see the order from the beads that is used In this tutorial. You start at the bottom-left and work to the bottom-right. The bottom two rows you string together as the first step. When you’ve done the bottom two rows you start threading alternately left and right. If you think this sounds way too complicated; don’t worry, just start beading and below we will accompany you.

To make sure the beads stay in their place, you can add a beadstopper. Pick a round bead and thread through this bead twice. The bead will stay in place on the thread and your creation won’t move.
Let’s start. String beads nr 1 through 6 onto your needle, as shown below.

Slide these beads together and string bead 7 onto your needle (in our case, the golden bead). String back (from right to left) through bead 5 (also a golden bead).

Bead 7 (gold) goes on top of bead 6 (brown).

String bead 8 (a brown bead) on your needle and thread from right to left through bead 3 (also a brown bead).

Bead 8 (brown) will end up exactly above bead 4 (gold).

String bead 9 (red) onto the needle and string it through bead 1 (also a red bead).

Bead 9 (red) will end up above bead 2 (brown).

For the next row of beads you’re going to thread from left to right. String bead 10 (gold) on your needle and go through bead 9 (red).

Bead 10 (gold) ends up above bead 1 (red).

Next, string bead 11 (red) and string from left to right through bead 8 (brown). The rows from the pattern will start to show now.

Repeat the remainder of the pattern until you’ve finished the end. Your pattern is correct when your thread starts on the left on the bottom and ends on the right on the top. Both long sides should count 25 beads.

At this point you only have to ‘zip’ the two endings together. You can bead the two endings to eachother, with or without the carrier bead inside. You can also add the divider later. It’s up to your preference.

Before you bead the endings together, check if the rows flow into each other with the colors overflowing. String through the first bead on the right on the other side and the first brown bead on the top.

You will see that both sides will interlock neatly. String through the beads of the two middle rows.

Finally string through the beads on the left.

Pull firmly on both threads and all the beads will connect. String back through the bead on the other side. To tie off you make some sharp turns with the thread. After 3 sharp turns the thread is secured and you won’t need to tie a knot anymore. Choose a row that isn’t the outer row to make these sharp turns, so that the extra thread won’t be visible on the outside.

This is how you wrap a tragerperlen in beads! You can choose how many tragerperlen beads you want on one necklace. You can add tragerperlern beads all around the necklace, or use just a few.

When you’re in doubt if you need to buy beads or if you have enough of one colour, you can check the overview. We calculated how many beads you need to wrap up one tragerperlen divider.

Now you’re ready to make your own creation. Good luck, and let us know if you have any questions!