
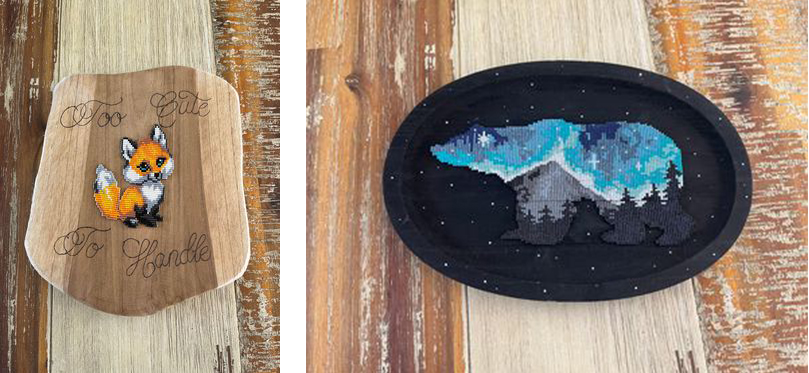
Tamira showed us her creations and we wanted to share them with you. She has made 2 beautiful creations with the Miyuki loom, which are shown here below. She explains about how she came up with the idea, how she made it, what she encountered and how she solved it creatively. You can read it all here below. Tamira, thanks for sharing!
On Pinterest I saw a beautiful peyote stitch bead creation presented on a disk of wood. I love the country style and it fell right up my alley.
Embroidery patterns
I immediately saved the idea on Pinterest, but I didn’t think the peyote stitch was quite my thing. That’s why I started looking for other patterns. I was not only looking for peyote patterns, but also beadloom patterns. I was not only looking for peyote patterns, but also beadloom pattern, but the pictures I found on pinterest were not so clear which makes it more difficult to see the exact pattern.
So, I continued my search and eventually ended up with embroidery patterns. These patterns are often clearer to see and easier to copy as a pattern on a blank pattern sheet. From there I found the fox and the bear.
In embroidey patterns the ‘stitches’ are alligned one below the other, which is similar with beading a bead loom, that’s why I chose for this technique. I made this with the Miyuki loom, because with this beadloom you can string 65 beads in 1 row. For the creations I used Miyuki delica 11/0 beads.
And when you make such a large one, I prefer to string double through each row, by threading through the upper row an extra time. This ensures that it becomes a nice, sturdy whole.
The bear
A problem that I ran into with the bear was that the original pattern was wider than 65 beads. I therefore chose to split the pattern into 2 separate patterns. So I made one half first and then the other half to join together later.
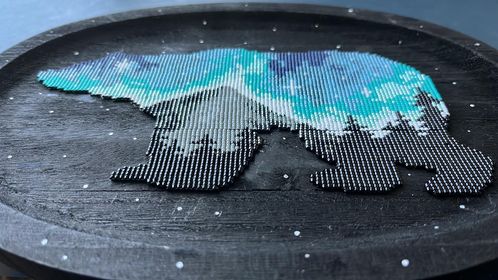
Looking back on the process now, I would not again choose a pattern that has to be split into 2 separate patterns, so I would really look at a pattern that is a maximum of 65 beads wide. I also made the costly mistake of making the 2 separate patterns ‘wrong way around’. This meant I couldn’t attach them immediately and had to repeat the second pattern.
After the 2 separate patterns were made on the beadloom, I strung them together. Unfortunately I couldn’t avoid it to see this a little bit, because it is attached in a different way, but I am critical. 🙂 But luckily it doesn’t distract too much from the beautiful end result, because I’m very happy with it.
The fox
The fox is less wide, so it did fit well on the loom. I was able to make the fox as one whole piece.
The tail of the fox is loose from the body of the fox. I started to loom from the head all the way down to where the tail of the fox is attached to his body. This is the point where I tied of the thread.
I attached a new beading thread to start looming the tail the same way as I started with the body: from the top downwards. You can determine the right height to start by looking at the pattern of the body. When finished it is still possible to move the woven beads a bit for the perfect adjustment. From the part where the tail and the body come together again, you can continue to weave the full width of the pattern.
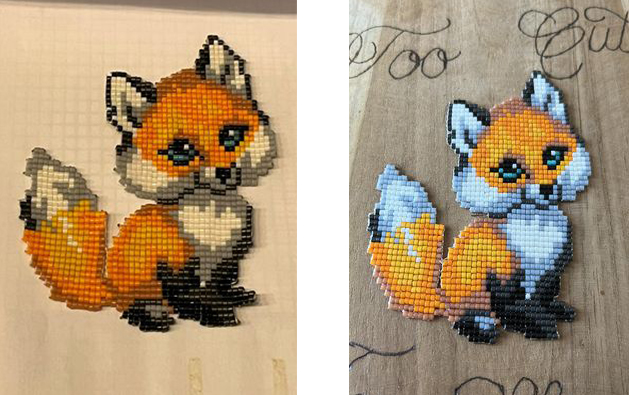
Once you reach the last row of the other piece, continue threading. And at the end of the row, double thread back through the row above to secure it together there as well. From here you can finish the bottom part across the entire width.
At last
After I finished stringing and securing the creations, I adhered them to the wooden disk with jewelry glue. All in all it took me about a week, from choosing a pattern, to drawing out the pattern, to transferring the pattern to the beadloom and finally attaching it to the wooden disc (which I bought at a local discount store).
Tamira, thank you very much for your explanation and tips!