

With Peyote you can make bracelets, keychains, belts and paintings. I made the last thing as a maternity gift for my brother and sister-in-law when my nephews were born. Continue reading for more information!
Below you can see an example of one of the paintings I made for my nephews. The work is made with the two-drop peyote (using two beads per stitch) and I chose for opaque colors. These colors have a nice contrast together and you can see clear lines between the colors. If I remember correctly there are around 20.000 beads in the painting.
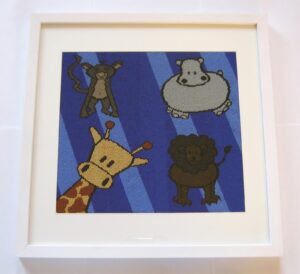
The advantage compared to weaving on a weaving frame is that a bead in the peyote stitch adjoins the bead next to it only partly. This means that you can make the colors overflow nicely.
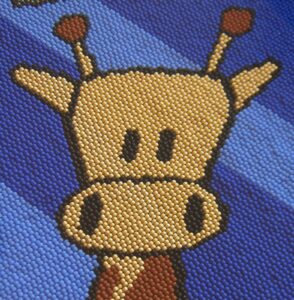
Below you can see a close-up of the giraffe in the painting. You can see that the overflow of the colors is very gradually. I chose the two-drop peyote because it give even more freedom in choosing the pattern.
Most of the time the delica beads are used for a peyote stitch, but as you can see the rocailles 11/0 also work very well. It’s important that all the beads have the same colortype. When you combine clear or silverlined beads with opaque beads, it looks less neat.
When you want to work out a pattern yourself, you can print pattern-paper on this website. These pages can be used to work your picture into a pattern. It’s an old-fashioned lay-out on the website, but the ratio between the beads and the square is pretty accurate. The only deviant thing that happened to my painting is that the animals got a bit fatter.
It’s important that the lines of your chosen drawing that the lines aren’t too detailed for the beads you’re going to use. Below you see a part of the picture that I used and you can see that it consists of simple drawings with little lines and details, especially noticable in the hippo.

With a bit of creativity you can trace the pictures onto the pattern-paper by using clear light behind it. Globally you draw the lines of the picture onto the graphpaper and after that you color the boxes in the right color to choose the beads you’re going to use. Ofcourse it’s no problem to deviate from the original picture and colors. For example, the monkey in the picture had no legs so I added these myself on the pattern-paper.
You can see there are lines drawn in the pattern. To keep track of where you are, making your painting, it’s necessary to cross out boxes. When you see these pictures, you wouldn’t think its easy to forget where you were, but this is the case. You are making such a detailed painting that it’s hard to see exactly what part of the pattern you’re stitching. When you make a mistake, you usually only realise this when you’re already working on the next row, which means you have to rip a lot!
Below is a close-up of the pattern-paper. To keep track of which part I’m stitching, I switch the color of the pen I use. This makes the counting and checking easier.

After I was finished stitching, I went to a store for creative supplies where passe-partouts can be cut into the right size. The passe-partout is always tapered to give depth, but with beads you can cut it the other way around. This way you can put it in ‘upside down’ and hide the edges of your piece. Two sides are uneven when using the peyote-stitch. When you find a nice frame, just assemble it and you’re done with the painting.
If you have any questions, don’t hesitate to ask them!
The pictures are not displaying?? I am beading a 12 x 12 and they are done in panels. Is there a specific way to combine/stitch the panels?
Dear Lynn,
Thank you very much for your remark, we will fix the pictures issue as soon as possible.
About how to stitch the panels, what I would recommend is make the 2 panels and zip it afterwards together with only needle and thread, without beads. It should zip in each other, just like for example the zipper of your jacket.
Other advice: make 2 small peyote pieces and zip it together to practice. Because if it goes wrong it takes less time to do it again (practice) then when it are bigger parts.
Good luck!
How do you mount the peyote beaded picture so that it doesn’t move and lays flat in frame when hanging on the wall?
Thank you!
Hi Wendy,
I think when it is framed in a photo frame it gets flat automatically, and you can use a little bit double sided tape on the back to keep it on its place.
Kind regards,
Sandra