

Reading a Peyote stitch pattern can feel like solving a secret code at first, but once you understand the logic, it’s actually quite simple! In an ‘even count’ pattern (one with an even number of beads), the rows start and end in a predictable rhythm. Plus, unlike the odd count version, you don’t need any tricky extra steps to move from one row to the next.
In this guide, we’ll break down exactly how to decipher these patterns so you can bead with confidence.
Most patterns provide two different ways to follow the design:
- The pattern map: A visual diagram showing exactly what the finished piece will look like.
- The word chart: A text-based description using letters and numbers, such as: (1)B, (1)C, (1)A, (1)C, (2)A, (1)C, (1)B, (1)A”).

The zigzag logic
In Peyote stitch, beads don’t sit directly on top of each other; they are staggered (like bricks). This is the golden rule for reading the visual pattern map:
- Rows 1 and 2 are a team: In most patterns, the first two rows are strung together as one straight line. In the diagram, you’ll see these as beads that alternate between “high” and “low” positions.
- The reading direction: You generally read the chart from the bottom up.
Row 1 & 2: From left (L) to right (the base).
Row 3: From right (R) to left.
Row 4: From left (L) to right.
And so on. - The ‘up-beads’: On the map, you will see certain beads sticking out higher than the ones next to them. These are your “up-beads”—the ones your needle will pass through as you work the next row.


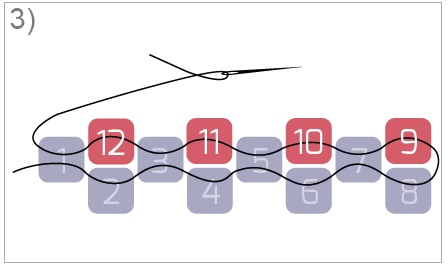
(Example how to start with row 1, 2 and 3.)
Deciphering the word chart
Every word chart starts with a legend. This tells you which letter corresponds to which bead color and exactly how many beads you need for the project.
Chart #:A
DB-310 (Opaque matte black)
Count:733
Chart #:B
DB-1589 (Opaque matte ghost gray)
Count:338
Chart #:C
DB-1834 (Galvanized duracoat champagne)
Count:34
Chart #:D
DB-301 (Matte gun metal)
Count:175
Next follows the word chart.:
Row 1&2 (L) (2)C, (1)A, (2)B, (2)A, (3)D, (2)A, (3)C, (3)A
Row 3 (R) (1)B, (1)C, (1)A, (1)C, (2)A, (1)C, (1)B, (1)A
Row 4 (L) (1)A, (1)B, (2)C, (1)A, (1)B, (2)A, (1)B
Row 5 (R) (2)C, (1)A, (1)C, (1)B, (1)C, (1)A, (1)C, (1)B
Row 6 (L) (1)A, (1)B, (2)C, (1)A, (1)B, (2)A, (1)B
Row 7 (R) (1)B, (1)C, (1)A, (1)C, (2)A, (1)C, (1)B, (1)A
Row 8 (L) (1)C, (1)A, (1)B, (1)A, (1)D, (1)A, (2)C, (1)A
Row 9 (R) (2)A, (1)C, (1)A, (2)D, (1)A, (1)B, (1)C
Row 10 (L) (1)B, (2)A, (1)D, (1)C, (1)D, (1)A, (1)D, (1)C
Etc.
Row 5 (R) (2)C, (1)A, (1)C, (1)B, (1)C, (1)A, (1)C, (1)B:
- (L) or (R): This tells you the direction (Left-to-right or Right-to-left).
- A, B, C, D, etc.: The color code from you legend.
- The number: This tells you how many beads of that color to add in total for that section of the row.
- Pro Tip: Even if the chart says (2)C, you still add them one by one, passing through an “up-bead” from the previous row after each one.
- Blank: If you see a blank, it means there is an open space in the design. This is common in more advanced, lacy patterns.
Tips & Tricks:
- Cross it off: Print your pattern and use a pen to cross off each row as you finish it. This prevents you from losing your place.
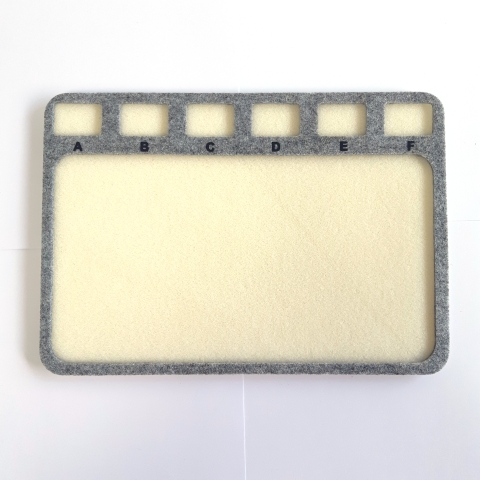
- Organize your workspace: Place your beads in small containers labeled with the letters (A, B, C). It’s much easier than trying to remember which shade of “gold” is which! A beading mat with labeled sections is a lifesaver.
- Use a stabilizer: The first three rows are the trickiest because the work feels loose. Use a Quick Start Peyote card or even a stiff needle to hold the first rows steady until the tension builds up.
- Want more detail? Check out our specific tutorials for the peyote even and odd count.
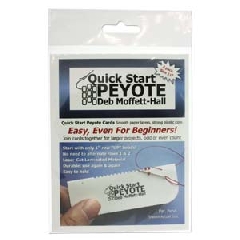
Using a Quick Start Peyote card how do you do row 1 and 2 since they are normally strung together. I seem not to get it to turn out right
Hello Gail,
Thank you for your question, the chart helps you create the space between the beads in the first row, so that you can easily place the beads between the first row with the second row. You can find many clear explanatory videos on YouTube.