
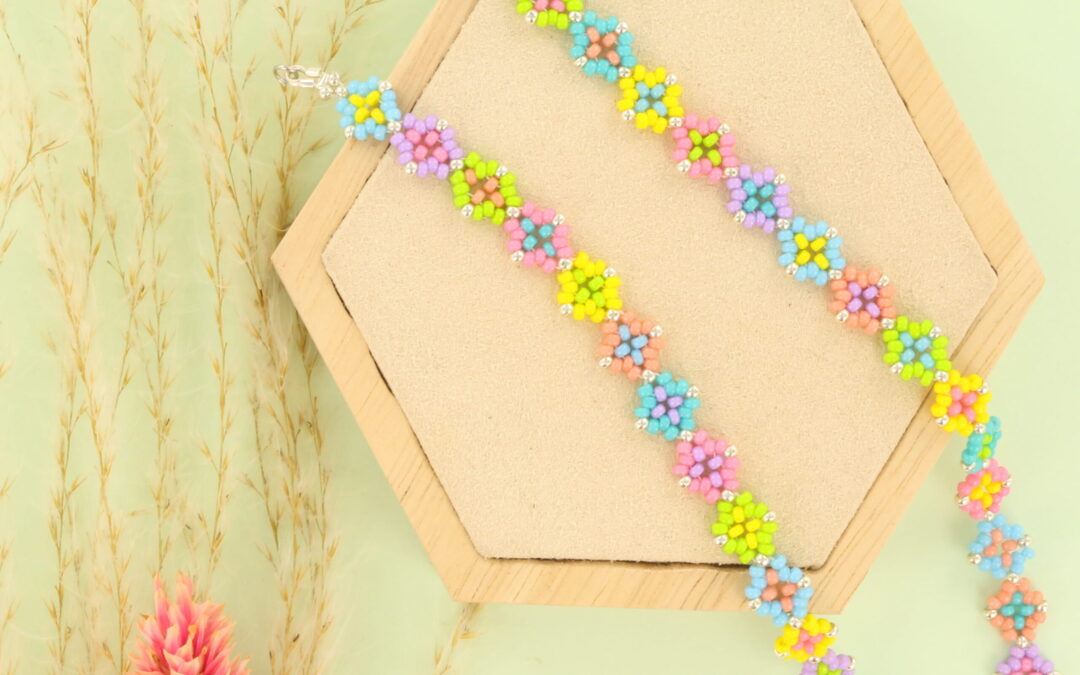
This bracelet reminds us of the granny square patterns you can make with crochet. That’s were the name comes from. This technique is a bit more challenging, so if you’re just starting with beading, we’d recommend saving this one for a while and trying it out later when you’re more experienced.
Needed supplies:
- Miyuki needle
- Fireline crystal 0.15mm
- Wire protector
- Crimp beads
- Lobster clasp
- Open ring 4mm
- Miyuki seed beads 11/0
- Miyuki seead beads 11/0 holi festival mix145 (11-404, 11-413, 11-4462, 11-4467, 11-4471, 11-4480, 11-4488)

To start, you’ll need a long piece of fireline; about 150 cm should be enough for a bracelet. I always start by stringing a wire protector and a crimp bead. Return the crimp bead to the crimp bead and crimp it closed. Leave a bit of fireline after the crimp bead to weave in at the end. Now you can start stringing. First, string three silver beads and then return them to two beads to create a triangle. I’ll leave the remaining piece of fireline on the side for now; we’ll weave it in at the end.

Now we’re going to start stringing the colors. You’ll string three beads alternating colors. In this case, blue will be the outer bead, and yellow will be the beads in the core. Then, thread the thread back through the silver bead to form a diamond pattern. Then, thread it through the blue and yellow beads again.

Next, you’ll string the colors of your first square alternately. 4 blue and 3 yellow, starting with the blue. Then, string them back through the first yellow bead. Now you have a nice circle of 4 yellow beads and 4 blue beads.

Then, thread through the next blue bead. Now string three beads onto one blue bead, one silver bead, and one blue bead. Then thread through the next blue bead.

Again, string three beads onto one blue bead, one silver bead, and one blue bead, and then thread them through the next blue bead. Repeat this process. So, string three beads—one blue bead, one silver bead, and one blue—and thread them through the next blue bead. Then, immediately thread them through the next blue bead.

Your first granny square is almost finished. Pass your needle through the silver bead and the next three blue beads again, so they’re neatly aligned. Then, thread through the next silver and blue beads, so you come out the bottom again and can begin the next one.

Now go through the last silver bead and string on three more beads. This time I chose purple for the outer bead and pink for the core. You string 1 purple, 1 pink, and 1 purple bead alternately. Create another diamond pattern by going through the silver bead. Then go through the purple and pink bead again. Now string the colors alternately: 4 purple and 3 pink. Start with purple and then string through the first pink bead, creating a circle.

Now, thread one purple bead through the purple bead, one silver bead, and one purple bead through the next, then thread it through the next purple bead. Then thread three more beads: one purple bead, one silver bead, and one purple bead, then thread it through the next purple bead.

You string three more beads: one purple, one silver, and one purple. Then you go through the next purple bead, and then immediately through the next purple bead and silver bead. Then you go through the next three purple beads so they connect nicely, and then you go back down through the next silver and purple beads until you reach the silver bead again.

Then you can continue on the next square by repeating the steps above. Make sure you pull your work tight and keep it under tension while stringing. This will pull the beads closer together, creating nice points and a cross in the middle. If your bracelet is long enough, you can finally string two silver beads and thread them back through two silver beads to create a triangle. After this, you can thread the crimp bead and wire protector and thread them back through the crimp bead, crimp the crimp bead closed. The last bit of fireline can now be removed from both sides of the bracelet by threading the wire back. Now, pull the first three silver beads straight and into a triangle.

Finally, attach the open jump rings and the lobster clasp, and your granny square bracelet is finished. You can, of course, make this bracelet with endless color combinations or seed bead mixes. I’ve chosen to alternate colors, but you can also make them all the same. That’s what makes this so fun!

Enjoy making this colorful bracelet!